rConfig on CentOS 6.6

I’ve used RANCID in the past, but I wanted to use a more modern configuration management tool at my current organization. I’ve been following the rConfig project for a while now and recently setup an instance of it on our network.

Here is a short guide on how to get rConfig up and running on a CentOS instance.

# CentOS not getting DHCP address on eth0 under VMware
/etc/sysconfig/network-scripts/ifcfg-eth0
edit and set to yes

# Install some tools
# I prefer vim over vi
sudo yum install net-tools
sudo yum install wget
sudo yum install zip unzip
sudo yum install vim-common vim-minimal vim-enhanced vim-X11

# Install Apache
sudo yum install httpd

#Install MySQL
yum install mysql mysql-server
service mysqld start

#Install PHP
yum install php php-common
yum install php-common php-cli php-mysql php-devel

# Service Restarts
service httpd restart
chkconfig httpd on
service mysqld restart
chkconfig mysqld on

# Adjust firewall to allow for inbound http
sudo iptables -I INPUT -p tcp --dport 80 -j ACCEPT
sudo service iptables save

# Use wget to get the rConfig zip from http://www.rconfig.com/index.php/download-menu
download, unzip to /home/rconfig

# Change ownership
chown -R apache /home/rconfig
mv /etc/httpd/conf/httpd.conf /etc/httpd/conf/httpd.conf.original
cp /home/rconfig/www/install/httpd.conf.new /etc/httpd/conf/httpd.conf

# Adjust permissions
vim /etc/selinux/config
"SELINUX=enforcing" to "SELINUX=disabled"

# Test that Apache and MySQL autostart
reboot

# Setup rConfig via the web interface
http://ipaddress/install/preinstall.php

# Create your rConfig user
mysql
CREATE USER 'rconfig_user'@'localhost' IDENTIFIED BY 'some-password';
GRANT ALL PRIVILEGES ON * . * TO 'rconfig_user'@'localhost';
FLUSH PRIVILEGES;

# Change rconfig_user password
SET PASSWORD FOR 'rconfig_user'@'localhost' = PASSWORD('some-password');

# Setup NTP
yum install ntp ntpdate ntp-doc
chkconfig ntpd on
ntpdate pool.ntp.org
/etc/init.d/ntpd start

 

GNS3 and VRRP Timers

While testing out a VRRP solution, I noticed that it was not performing as expected. The VRRP address was unresponsive so I started to investigate. Turning on console logging, I saw a large amount of flapping between Backup and Master states.

...
*Mar  1 02:37:23.739: VRRP: Grp 1 Event - Master down timer expired
*Mar  1 02:37:23.739: %VRRP-6-STATECHANGE: Vl20 Grp 1 state Backup -> Master
*Mar  1 02:37:25.095: %VRRP-6-STATECHANGE: Vl20 Grp 1 state Master -> Backup
...

It turns out that running 8 routers in GNS3 on my laptop was slightly under-powered platform and resulting in over a 2 second maximum response time from a VRRP peer.

Sending 8000, 100-byte ICMP Echos to 10.10.20.1, timeout is 2 seconds:
!!!!!!!!!!!!!!!!!!!!!!!!!!!!!!!!!!!!!!!!!!!!!!!!!!!!!!!!!!!!!!!!!!!!!!
!!!!!!!!!!!!!!!!!!!!!!!!!!!!!!!!!!!!!!!..!!!..........................
......................................................!!!!!!!!!!!!!!!!
!!....................................................................
.....................!!!......................!!!!!!!!!!!.!!!!!!!!!!!!
..!!!!!!!!!!!!!!!!!!!.!!!!!!!!!!!!!!!!!!!!!!!!!!!!!!!!!!!!!!!!!!!!!!!!
!!!!!!!!!!!!!!!!!!!!!!!!!!!!!!!!!!!!!!!.!!!!!!!!!!!!.!!!!!!!!!!!!!!!!!
!!!!!!!!!!!!!!!.!!!!!!!!!!!!!!!!!!!!!!!!!!!!!!!!!!!!!!!!!!!!!!!!!!!!!!
!!!!!!!!!!!!!!!!!!!!!!.!!!!!!!!!!!!!!!!!!!!!!!!!!!!!!!!!!!!!!!!!!!!!!!
!!!!!!!!!!!!!!!!!!!!!!!!!!!!!!!!!!!!.!!!!.!!!!!!!!!!.!!!!!!!!!!.!!!!!!
!!!!!!!!!!!!!!!!!!!!!!!!!!!!!!!!!!!!!!!!!.!!!!!!!!!!!!!!!!!!!!!!!!!!!!
!!!!!!!!!!!!!!!!!!!!!!!!!!!!!!!!!!!!!!!!!!!!!!!.
Success rate is 74 percent (611/818), round-trip min/avg/max = 4/705/1996 ms
Server-A#

After adjusting the advertise timers, everything started to perform as expected.

R1#
interface Vlan20
 ip address 10.10.20.2 255.255.255.0
 vrrp 1 ip 10.10.20.1
 vrrp 1 timers advertise 10
 vrrp 1 priority 110
 
R2#
interface Vlan20
 ip address 10.10.20.3 255.255.255.0
 vrrp 1 ip 10.10.20.1
 vrrp 1 timers advertise 10


CCNP Achieved

I passed CCNP Route 642-813 in January before the exam changed thus completing all three exams. Route was the most challenging of the three exams for me because I am now taking the lead on projects that involve routing, which is part of why I wanted to peruse the certification. Exciting times and I’ve started to take a peek at the CCIE 5.0 exam.

url

Port Forwarding with Private Internet Access VPN Service

I had a hard time finding details on how to setup port forwarding with Private Internet Access so I wanted to share the details on how to set it up on a Debian system. The following directions will help you find your local IP access, request a port from Private Internet Access for Port Forwarding, configure your local firewall to allow inbound connections, and confirm that your application is listening on the specified port.

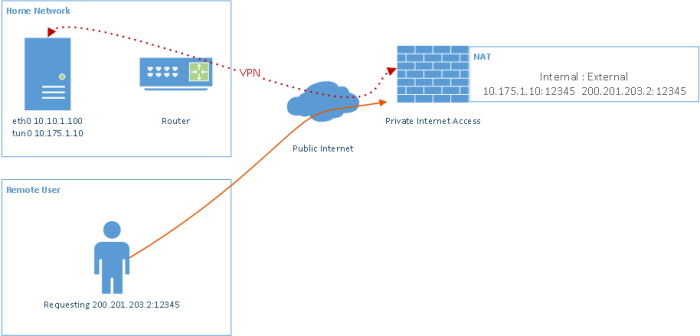
Here is a overview of the network topology with a remote user requesting to talk to your machine at home over the VPN connection to Private Internet Access with Port Forwarding setup on port 12345.

2014-10-22_port_forward_detail

  1. Obtain the VPN IP address by looking at the IP addresses in ifconfig. On my machine, the interface is a tun0 interface.
  2. Create a unique client ID with head -n 100 /dev/urandom | md5sum | tr -d ” -” > ~/.pia_client_id
  3. Request a port for port forwarding with curl -d “user=your_username&pass=your_password&client_id=$(cat ~/.pia_client_id)&local_ip=10.xxx.xxx.xxx” https://www.privateinternetaccess.com/vpninfo/port_forward_assignment
  4. Modify firewall to allow inbound traffic with sudo iptables -A INPUT -p tcp –dport 12345:12345 -j ACCEPT
  5. Set your application to listen on port 12345
  6. Confirm that your application is listening with sudo netstat -anp | grep 12345

Reserved IP Addresses in prefix-list Format

Use these with the load merge terminal command for easy cut-and-pasting in Junos.

policy-options {
    prefix-list localhost {
        127.0.0.1/32;
    }
    prefix-list martians-IPv4 {
        0.0.0.0/8;
        10.0.0.0/8;
        127.0.0.0/8;
        169.254.0.0/16;
        172.16.0.0/12;
        192.168.0.0/16;
    }
    prefix-list multicast {
        224.0.0.0/4;
    }
    prefix-list multicast-all-systems {
        224.0.0.1/32;
    }
    prefix-list rfc1918 {
        10.0.0.0/8;
        172.16.0.0/12;
        192.168.0.0/16;
    }
    prefix-list martians-IPv6 {
        ::/96;
        ::1/128;
        fe80::/10;
        fec0::/10;
        ff00::/8;
        ff02::/16;
    }
    prefix-list other-bad-src-addrs-IPv6 {
        ::/128;
        ::ffff:0.0.0.0/96;
        ::ffff:10.0.0.0/104;
        ::ffff:127.0.0.0/104;
        ::ffff:172.16.0.0/108;
        ::ffff:192.168.0.0/112;
        ::ffff:224.0.0.0/100;
        ::ffff:240.0.0.0/100;
        ::ffff:255.0.0.0/104;
        2001:db8::/32;
        2002:0000::/24;
        2002:0a00::/24;
        2002:7f00::/24;
        2002:ac10::/28;
        2002:c0a8::/32;
        2002:e000::/20;
        2002:ff00::/24;
        3ffe::/16;
        fc00::/7;
    }
}